


OneBlade - | Hybrid Trimmer and Shaver with Dual Protection Technology | Most Skin Friendly Trim | QP1424/10
Alert me if this item is restocked.
We often restock popular items or they may be returned by the other customers. If you would like to be notified when this happens just enter your details below.
OneBlade - | Hybrid Trimmer and Shaver with Dual Protection Technology | Most Skin Friendly Trim | QP1424/10
We respect your privacy and don't share your email with anybody.
Alert me if this item is restocked
We have cancelled your request.
Other Option:
OneBlade - | Hybrid Trimmer and Shaver with Dual Protection Technology | Most Skin Friendly Trim | QP1424/10
Additional Information:
- Quick Checkout - Enjoy Additional Offer on the Checkout
-
 2 year with product Registration
-
 Free Shipping Over Rs. 1500
-
 Secure Checkout
-
 Genuine Product


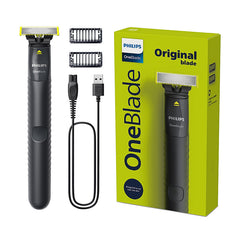
Trim, edge and shave any length of hair
Designed to cut hair, not skin
- Trim, edge and shave
- 1 x Original Blade
- Rechargeable, wet & dry use
- For any length of hair
- 2 x click-on stubble combs (1, 3 mm)

Unique OneBlade Technology
Philips OneBlade has a revolutionary technology designed for facial grooming. It can shave any length of hair. Its dual protection system - a glide coating combined with rounded tips makes shaving easier and comfortable. Its shaving technology features a fast-moving cutter (6000x per min) so it's efficient - even on longer hairs.

Trim it down
Trim your beard to an even stubble length with one of the included 2 stubble combs: 1mm for a 5 o'clock, and 3mm for a tight trim

Edge it up
Create precise edges with the dual-sided blade. You can shave in either direction to get great visibility and see every hair that you're cutting. Line up your style in seconds!

Shave it off
OneBlade doesn't shave as close as a traditional blade - so your skin stays comfortable. Go against the grain and shave off any length of hair easily
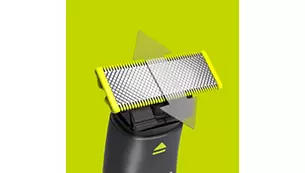
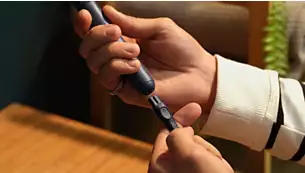
Dual-sided blade: designed for precision and control
OneBlade follows the contours of your face, allowing you to easily and comfortably shave all areas. Use the dual-sided blade to style your edges and create clean lines by moving the blade in any direction
Blade that doesn't fade easy
Durable stainless steel blade that lasts up to 4 months of use* to keep that fresh feel.When the replacement indicator - eject icon - will appear on the blade, the blade performance may no longer be optimal. It is time to consider changing the blade for the best shaving experience
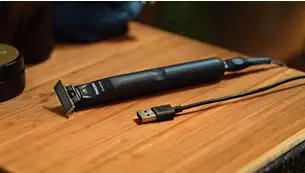
Charge anytime, anywhere
Can be charged at home or on the road, perfect for your daily routine and for travel.
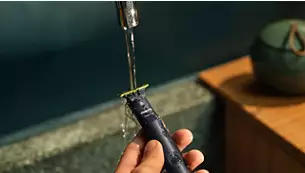
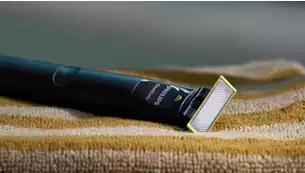
Fully waterproof
OneBlade is fully waterproof (IPX7), so it is easy to clean: just rinse it under the tap. You can shave wet or dry, even in the shower - whichever you prefer. No shaving foam needed
Long lasting battery
Rechargeable NimH battery delivers 30 minutes of constant shaving power after an 8 hour charge
-
Trimming & Shaving Performance
- Shaving system
-
- Contour-following technology
- Original Blade
- Dual protection system
- Trimming system
-
Contour-following technology
-
Accessories
- Maintenance
-
Protection cap
- Comb
-
2 click-on stubble combs (1, 3mm)
-
Design
- Handle
-
Ergonomic grip & handling
- Color
-
Charcoal gray
-
Ease Of Use
- Charging
-
- Rechargeable
- USB-A Charging (5V⎓ / ≥1A)
- Wet and dry usage
-
Yes
-
Service
- 2-year warranty
-
Yes
- Replacement head
-
- QP210, QP220, QP230
- Replace every 4 months*
-
Power
- Automatic voltage
-
5 V
- Battery type
-
Ni-MH
- Charging
-
8 hours full charge
- Run time
-
30 minutes
- Max power consumption
-
0.5 W
- USB-A
-
Yes
We will continue supplying USB charging cables with the product that can be used with a USB power adapter.
Below is more information about which power adapter you can use with your Philips product.
Can I buy the USB adapter through Philips.com?
The availability of purchasing a Philips USB power adapter varies by country. You can search for one of the adapters below (HQ87 or WAA1001/WA2001) or search “USB wall adapter” or “wall adapter” on the Philips.com site. Please contact us if you do not find what you are looking for.
I already own a USB power adapter
If you already own a USB power adapter, make sure that the power adapter is certified and meets safety standards, ideally from a trustworthy brand. See the safety standards for safe charging below:
Input voltage: 100-240V.
Output voltage: 5V.
Power output: 1A or higher.
If you want to use or charge your product in a moist environment, for example, in the bathroom, always use a splash-proof (IPX4) rated adapter.
I do not own a USB power adapter
We recommend a splash-proof (IPX4) adapter. You can get this adapter in the Philips online store or any other retailer. Look for "IPX4" text or symbols on the adapter.
You can find an example of the HQ87 IPX4 wall adapter below.
Note: Icons and images designating splash proof or IPX4 vary by country. Check your user manual for recommended USB wall chargers depending on your product.
Product category Recommended adapter
Philips Grooming and Beauty: OneBlade, Shaver's, Lady Shavers, Groomers, and Hair Clippers Philips HQ87 splash-proof IPX4 adapter.
Philips Sonicare: Electric toothbrushes and water flossers Philips WAA1001 splash-proof IPX4 adapter (White)
Philips WAA2001 splash-proof IPX4 adapter (Black)
More information?
You can find more information about our sustainability goals at Philips.com
The information on this page applies to the following models: MG5930/65, MG9551/65, MG7920/65, BT1230/18, BT1235/18, BT1234/18, BT1233/18, QP1424/10, HX3641/11, HX3671/14, HX3671/13, BT1230/15, BT1235/15, BT1234/16, BT1233/15, BT1232/15, BT1232/18, BT1210/16, BT1212/15, BT1210/15, BT1215/15, BT1213/15.
Note: please read the safety information below carefully before charging your product. For full important safety information, please refer to the documents provided with your product.
Safety first
If you charge your Philips product in a moist environment (e.g. a bathroom), always use an IPX4 adapter to ensure safe charging. IPX4 indicates that the adapter is splash-proof.
Whichever adapter you choose, ensure that it meets the requirements below (this information will usually be printed on the adapter itself).
Input voltage: 100-240V.
Output voltage: 5V.
Power output: 1A or higher.
Water tightness: IPX4 for moist environments.
Approval mark: relevant approval/certification mark for your country (e.g. CE, UL, UKCA, INMETRO, IRAM, etc.)
Important: using a non-certified adapter may cause hazards or serious injuries. Always disconnect the product from the adapter before cleaning it with water.
Philips adapter
If you don't have one, you can purchase a suitable adapter from Philips directly. The adapter's model number will differ depending on the type of product you own.
Philips Grooming and Beauty- OneBlade, Shavers, Lady Shavers, Groomers, and Hair Clippers:
Philips HQ87 IPX4 adapter.
Philips Sonicare- Electric toothbrushes and flossers:
Philips WAA1001 splash-proof IPX4 adapter (White) or Philips WAA2001 splash-proof IPX4 adapter (Black).
To purchase a Philips adapter:
If you live in the United States click here to request an adapter
If you live in Canada click here and contact support for assistance.
If you live anywhere else in the world click here and enter the relevant adapter model number in the search bar at the top of the page. Note that the search bar at the top of this page is optimized to locate product support information. Therefore, it is important to click the link provided and use the search function on the new page, not this one.
Integrated USB sockets/outlets
You can use a dedicated USB plug socket in a building to charge your product, provided it meets the specifications indicated in the "Safety first" section above. Unplug the product from the supply unit before cleaning it with water.
USB adapter from another brand
You can use a USB wall adapter from any reputable brand to charge your product, provided it meets the specifications listed in the "Safety first" section above. This information should be printed on the adapter itself, as in the example below:
Image showing the specifications printed on a USB adapter plug
The information on this page applies to the following models: MG5930/65, MG9551/65, MG7920/65, QP1624/10, S3144/03, BT3301/30, BT3303/30, BT3302/15, BT1230/18, BT1235/18, BT1234/18, BT1233/18, QP1424/10, BT1230/15, BT1235/15, BT1234/16, BT1233/15, BT1232/15, BT1232/18, BT1210/16, BT1212/15, BT1210/15, BT1215/15, BT1213/15.
To ensure the correct charging time we recommend using a 5V, 1A USB adapter.
Don't have one? You can obtain a suitable adapter from Philips (for example, the HQ87 IPX4 USB adapter) via www.philips.com/support.
The information on this page applies to the following models: MG5930/65, MG9551/65, MG7920/65, BT1230/18, BT1235/18, BT1234/18, BT1233/18, BT1230/15, BT1235/15, BT1234/16, BT1233/15, BT1232/15, BT1232/18, BT1210/16, BT1212/15, BT1210/15, BT1215/15, BT1213/15.
What does beard trimming involve?
If you follow the proper way to trim a beard, you’ll be aiming for an even length all over, and a proper beard neckline, cheekline, mustache and lipline. Here’s how to achieve that.
Step 1: The all-over beard trim
Wash and dry your beard and face. If your beard trimmer or multigroomer comes with multiple click-on beard combs, you can use these to get the desired hair length. The numbers on the combs indicate the length of the remaining hair after trimming. Simply click-on the appropriate comb onto the appliance and start trimming. If your appliance comes with an adjustable comb, set the right setting first.
If your product comes with a click-on skin protect comb, this can help you protect your skin while creating a close trim. The skin protect comb is designed to give you a comfortable, clean look while providing complete skin protection. The comb guides the skin away from the blades for a close, smooth trim.
But when you trim for the first time, you may start by using the comb with the maximum trimming length setting or the highest length setting to familiarize yourself with the product first.
Go against the direction of hair growth to remove excess bulk. Repeat using shorter trim settings until you’re happy with the length.
Step 2: Define your neckline
For the perfect beard neckline, put a finger horizontally just above your Adam’s Apple and trim a vertical strip below this line. Work outwards under your jawline to one side, then return to the center and work your way to the other side. You’re only excused this step if you prefer to have stubble. If you are trimming a full beard, the neckline matters. Struggling? Our beard neckline guide here can give you more details.
Step 3: Follow your beard trim through with a shave
Shave off the trimmed hairs located below your new beard neckline. You can remove these hairs by using a Philips electric shaver, trimmer without a comb or a manual blade. If your product comes with a click-on skin protect comb, this can help you protect your skin while creating a close trim. When using the trimmer or skin protect comb, place the flat side of the cutting element against your skin and make strokes against the direction of hair growth to trim hair close to the skin.
Step 4: Choose your cheekline
If you’re happy with a natural beard cheekline, leave it as it is. For an edgier, crisper look, go for a straight or slightly rounded line to the bottom of your sideburns. You can shape your cheekline by holding the cutting element perpendicular to the skin and move it upwards or downwards with gentle pressure. The lower your cheekline, the more length you’ll give to your face. Get tips on cheekline shaping here.
Step 5: Shape up your mustache
You can trim your mustache to the same length as your beard, or leave it slightly longer to make it stand out more. For a nice, clean lipline, close your mouth and smile. Keep your mustache clean and trim the bottom (without the trimmer comb) to create a 1 mm clear line above your lips (optional).
The information on this page applies to the following models: MG5930/65, MG9551/65, MG7920/65, BT1230/18, BT1235/18, BT1234/18, BT1233/18, MG7707/15, BT3125/15, MG3721/65, MG3710/65, MG7715/65, BT3231/15, BT3241/15, BT3235/15, BT3102/25, BT1230/15, BT3101/25, BT1235/15, BT1234/16, BT1233/15, BT1232/15, BT1232/18, MG5730/15, MG3721/77, MG3747/15, BT3101/15, BT3102/15, BT3105/15, BT1210/16, BT7501/15, BT3203/85, BT3201/15, BT3227/15, BT3221/15, BT3215/15, BT3205/15, BT3203/15, MG7745/15, BT3216/13, MG3730/15, MG7715/15, BT3211/15, BT1212/15, BT1210/15, BT1215/15, BT1213/15, MG7715/13, MG3710/13, MG3730/13, MG3732/65, QT3315/10, QT4009/15, QT4003/15, MG5740/15, QT3310/15, BT7206/15, QT4018/15, BT990/15, BT5200/15, BT1000/15, BT1005/10, QT4006/15, BT3200/15, QG3382/15, QG3389/15, QG3347/15, QG3387/15, QT4001/15, QT4011/15, QT4000/15, BT9280/15, QG3383/15, QG3383/16, QG3333/15, QG3343/16, QG3320/15, QT4005/15, QT4019/15.
Crossed out tap symbol
If you see a crossed out tap symbol on the box or body of your groomer, it means that the groomer is not washable and should be cleaned without water.
Philips Groomer not washable
Tap symbol
A tap symbol printed on your grooming device indicates that it is washable and its parts (cutters and combs) can be cleaned with water. However, this does not mean that you can use it to clip or trim your hair in the shower or bath.
Philips Groomer washable
Bath or shower symbol
If you see a shower or bath symbol printed on your groomer, it means that your device is waterproof. It can be safely cleaned with water and used while taking a shower or a bath. For safety reasons, these waterproof groomers can only be used cordless and will not turn on if they are connected to the power supply.
Note: Please keep in mind that the symbols on your Philips Groomer vary per model type. If you are still unsure whether it is safe to clean your Philips Groomer with water then please contact us for further support.
Philips Groomer waterproof
The information on this page applies to the following models: MG5930/65, MG9551/65, MG7920/65, BT1230/18, BT1235/18, BT1234/18, BT1233/18, MG7707/15, BT3125/15, MG3710/65, MG7715/65, MG3721/65, BT3231/15, BT3241/15, BT3235/15, BT3102/25, BT1230/15, BT3101/25, BT1235/15, BT1234/16, BT1233/15, BT1232/15, BG3005/15, BT1232/18, MG5730/15, MG3721/77, MG3747/15, HC3505/15, NT3650/16, BT3101/15, BT3102/15, BT3105/15, BT1210/16, BT7501/15, BG3006/15, BT3203/85, BT3201/15, BT3227/15, BT3221/15, BT3215/15, BT3205/15, BT3203/15, MG7745/15, BT3216/13, MG3730/15, MG7715/15, BT3211/15, BT1212/15, BT1210/15, BT1215/15, BT1213/15, MG7715/13, MG3710/13, MG3730/13, MG3732/65, QT4003/15, QT4009/15, MG5740/15, NT1120/10, BT7206/15, QT4018/15, BT990/15, BT5200/15, BT1000/15, BT1005/10, NT1150/10, QT4006/15, BG1024/16, BG1025/15, BG105/11, BT3200/15, QG3382/15, QG3389/15, QG3347/15, QG3387/15, QT4001/15, QT4011/15, QT4000/15, QT4005/15, QT4019/15.
Published on 08 July 2024
Philips Hair Clippers are ideal for cutting your own hair or those of a friend or family member. In this article we provide details of how to cut your own hair, as well as some practical tips.
Before use
Before cutting your hair, make sure you have all the right equipment. You will need a Philips Hair or a multigroomer with hair clipping attachments, a mirror, and a cape or towel to cover your neck and shoulders during trimming.
Wet hair is trickier to trim as they tend to stick to your skin and can be missed by the device. Therefore, we advise clipping your hair when they are completely dry.
Comb your hair in the direction of your natural hair growth.
If you are cutting someone else's hair, make sure their head is at the same level as your chest. This ensures that all parts of the head are clearly visible and within easy reach.
Note: Beard trimmers are designed to trim beard hairs only. We do not recommend using it on other body parts such as your head. This is because you will not get desired results, and it may also cause skin damage.
Instructions to use
1. Attach the desired comb to the clipper handle. If the attachments are not placed correctly, the groomer may not work, or give desired results.
2. Set the desired length setting. You can do this by turning the length-setting wheel or attaching the correct click-on comb. Start trimming at a high length setting to familiarize yourself with the device and reduce the length setting gradually until you have reached the desired hair length.
3. Switch on the device.
4. Move the appliance gently and steadily, with light pressure against the direction of hair growth. Make sure that the flat part of the comb always stays in contact with your skin to obtain an even result.
5. Do not press the groomer too hard against your scalp or skin. You may accidentally change the settings which can result in an uneven trim.
Use the trimmer without the trimming comb to trim hair close to the skin (approx. 0.5 mm) or to contour the neckline and sideburns by holding it at a 90-degree angle. Move the groomer against the direction of hair growth in well-controlled movements. To remove stubborn hair, try moving the shaver in different directions. Be careful when you trim without a comb because the cutting unit removes every hair it touches.
6. Hair can collect in the hair chamber and the comb. Shake the hair off regularly in between turns and strokes. Once you have finished, turn the device off and clean the appliance, combs, and hair chamber. Clean the device after each use. .
How to use Philips Hair Clipper
Clipping children's hair
Philips has special hair clippers designed for kids. When using these follow the same instructions as a clipper for an adult, but take care of some extra things.
For optimal safety, we advise you to always use the kids hair clipper with a comb.
After cleaning the clipper, also apply a drop of oil on its cutting teeth.
How to use Philips Kids Hair clipper
Video tutorial for a Buzz Cut
Check out our video tutorial on how to do a buzz cut at home using your Philips Hair Clippers.
Video tutorial for a Crew Cut
Check out our video tutorial on how to do a crew cut at home using your Philips Hair Clippers.
Note: trimming without a comb
The cutting element is the primary unit of your Philips Groomer. It has short, sharp edges to give you a fast and clean trim.
Use the trimmer without the trimming comb to trim hair close to the skin (to a length of approximately 0.5 mm) or contour your neckline or sideburns by holding it at a 90-degree angle to your skin.
When trimming without the comb attached, we advise that you:
Be careful with the edges of cutting teeth.
Note that the cutting unit will remove every hair it touches.
Move the groomer against the direction of hair growth with well-controlled movements and gentle pressure applied.
The information on this page applies to the following models: MG5930/65, MG9551/65, MG7920/65, MG3750/33, MG3710/65, MG3721/65, MG5730/15, MG3721/77, MG3747/15, HC3505/15, MG3730/15, MG3730/13, MG3732/65, MG5740/15, HC3420/15, HC5450/15, QC5132/15. Click here to show less product numbers
Get exclusive deals on sign up
Products
Support
My Philips
My Philips / Product Registration
support search icon
Type about your issue or model number to get support
FACE Stylers and grooming kits
Multigroomers
All-in-One Trimmer Series 7000
Troubleshooting & support
All-in-One Trimmer
Series 7000
Model number
MG5930/65
View product specification
Charging indications
Most Philips Hair Clippers and Trimmers have charging indications and lights on them to indicate when your device needs to be charged and is fully charged. Depending on the device you own the charging indications may be displayed in many different ways, as shown in the image below.
Some grooming devices do not have any charging indication on them. In that case, check the product's charger to see if has a light on it. This light lights up when the charger is connected to the power supply. For these products, follow the advised charging time as instructed in the user manual.
Philips Groomer charging indications
Travel lock
Some grooming devices come with a travel lock functionality to prevent your groomer from turning on by accident while travelling.
To activate the travel lock press and hold the on/off button for 3 seconds. The lock symbol will flash briefly to indicate that the device is locked now. If you try to switch it on it will not work, rather the travel lock symbol will flash to remind you to deactivate it.
To deactivate the travel lock you can again press and hold the power button for 3 seconds. The symbol will again flash briefly and then the groomer will turn on.
Some devices have the travel lock feature without a visible indicator. Locking and unlocking these devices works similarly as those with a travel lock indicator. Hold the on/off button for 3 seconds to activate or deactivate the lock feature.
Philips Groomer travel lock
Turbo mode
Some Philips Hair Clippers and Multigroomers are equipped with a Turbo Mode. This is usually indicated with a T shaped symbol on the clipper. Press this button when you need extra power from your clipper. This can be useful when you are trimming very thick hair.
Philips Groomer Turbo Mode
Quiet mode
A device with a baby symbol can be used to activate the quiet mode. Quiet mode provides a gentler trimming experience for children. During trimming, you can start the quiet mode to lower the rotation speed of the trimmer for a quieter trim.
Philips Groomer Quiet Mode
Oil reminder
If you see the image of an oil drop flashing on your grooming device, this is a reminder for you to oil your groomer. You should regularly clean and oil your groomers with the oil provided in the package or sewing machine oil.
Depending on the grooming device you own, you may find other symbols printed or flashing on it. For more information regarding your exact model please refer to the user manual or contact us.
Watch the video below to see how to use our latest Philips Beard Trimmer Prestige with unique built-in comb. Keep in mind that depending on the model type, the features on the shaver will vary.
Philips Groomer oil reminder
Opening battery compartment
Some Philips groomers operate on disposable batteries. Before attempting to insert or replace the batteries for your groomer, make sure your hands and the device are dry.
The battery compartment is located in the handle. To replace the batteries, the battery compartment can easily be opened by aligning the indications of the symbols as instructed below.
1. To remove the battery compartment cover, turn it clockwise until the setting indicator (V) points to the 'unlocked' indication (Ʌ) (Fig. 4).
2. Pull the battery compartment cover off the handle (Fig. 5).
3. Put the battery in the battery compartment (Fig. 6). Make sure the + and - poles of the battery point in the right direction.
4. Slide the battery compartment cover back onto the handle (Fig. 7).
5. Turn the battery compartment cover counterclockwise until the setting indicator (V) points to the 'locked’ indication (I) (Fig. 8).
Philips Battery Compartment
Eject button
An eject logo or button indicates where to push to remove cutting elements or attachments. Carefully push the eject symbol while slowly pulling the cutting element or attachment off the device.
Groomer Eject Button
The information on this page applies to the following models: MG5930/65, MG9551/65, MG7920/65, BT1230/18, BT1235/18, BT1234/18, BT1233/18, MG3750/33, MG7707/15, BT3125/15, MG3710/65, MG7715/65, MG3721/65, BT3231/15, BT3241/15, BT3235/15, BT1230/15, BT1235/15, BT1234/16, BT1233/15, BT1232/15, BG3005/15, BT1232/18, MG5730/15, MG3721/77, MG3747/15, HC3505/15, BT3101/15, BT1210/16, BT7501/15, BG3006/15, BT3201/15, BT3227/15, BT3221/15, BT3215/15, BT3205/15, BT3203/15, MG7745/15, BT3216/13, MG3730/15, MG7715/15, BT3211/15, BT1212/15, BT1210/15, BT1215/15, BT1213/15, MG7715/13, MG3710/13, MG3730/13, MG3732/65, QT3315/10, QT4009/15, QT4003/15, MG5740/15, QT3310/15, QT4018/15, QT4006/15, BG1024/16, BG1025/15, BG105/11, QT4001/15, QT4011/15, QT4000/15, BT9280/15, QG3320/15, QT4005/15, QT4019/15.
Showerproof and washable devices
Waterproof trimmers and clippers can be safely used and cleaned with water. However, these devices will not work when they are plugged into an electric socket. They are designed this way to prevent any kind of accidents.
To find out if your groomer is showerproof look for the following symbol, printed on the body of your device.
Philips waterproof groomers
Non-washable devices
Some Philips Groomers are only meant for dry use. This means you cannot use them or clean them with water. These types of devices can be used while they are plugged in to an electric socket.
To check if your device is non-washable look for the following symbol printed on it.
Philips non-washable groomers
Washable devices
Some Philips Groomers suitable for dry use can still be cleaned with water. These can be used while they are connected to the power outlet. However, while cleaning them with water make sure you unplug them first.
These type of washable devices have the following symbol printed on them.
If you are still unsure about the usage of your grooming device, then please consult your user manual for further details or contact us.
Philips washable groomers
The information on this page applies to the following models: MG5930/65, MG9551/65, MG7920/65, BT1230/18, BT1235/18, BT1234/18, BT1233/18, MG3750/33, MG7707/15, BT3125/15, MG3710/65, MG7715/65, MG3721/65, BT3231/15, BT3241/15, BT3235/15, BT3102/25, BT1230/15, BT3101/25, BT1235/15, BT1234/16, BT1233/15, BT1232/15, BG3005/15, BT1232/18, MG5730/15, MG3721/77, MG3747/15, HC3505/15, BT3101/15, BT3102/15, BT3105/15, BT1210/16, BT7501/15, BG3006/15, BT3203/85, BT3201/15, BT3227/15, BT3221/15, BT3215/15, BT3205/15, BT3203/15, MG7745/15, BT3216/13, MG3730/15, MG7715/15, BT3211/15, BT1212/15, BT1210/15, BT1215/15, BT1213/15, MG7715/13, MG3710/13, MG3730/13, MG3732/65, QT3315/10, QT4009/15, QT4003/15, MG5740/15, QT3310/15, BT7206/15, QT4018/15, BT990/15, BT5200/15, BT1000/15, BT1005/10, QT4006/15, BG1024/16, BG1025/15, BG105/11, BT3200/15, QG3382/15, QG3389/15, QG3347/15, QG3387/15, QT4001/15, QT4011/15, QT4000/15, HC3420/15, HC5450/15, BT9280/15, QG3383/15, QG3383/16, QG3333/15, QG3343/16, QG3320/15, BG2024/15, QT4005/15, QT4019/15.
Published on 08 July 2024
To maintain optimum performance of your Philips Groomer, it is important to clean the product after each use. Because of hygienic reasons, we advise to limit the use of the device to 1 person. Do not use corrosive detergents, scouring pads or cloths, petrol, acetone etc. to clean the groomer.
See the following instructions on how to clean your Philips Groomer below.
Washable groomers
Washable groomers have a water tap printed on the back of the handle or located in the user manual. Washable groomers with a water tap can be cleaned with water, however this does not mean that you can use it to clip or trim your hair in the shower or bath. To clean these devices, take off the attachments and cutter and clean the area underneath it with water. Do not use soapy water or any cleaning detergents, as this can remove the protective grease on the cutter and effect its performance. Wash and dry the attachments separately before reattaching them to the groomer. Never immerse the appliance in water.
Washable groomers
Showerproof groomers
Showerproof groomers have a shower/bath symbol and can be safely cleaned with water and used while taking a shower or bath. For safety reasons, these waterproof groomers can only be used cordless and will not turn on if they are connected to the power supply.
Before cleaning, ensure the power is off and the appliance is disconnected from the wall socket. To clean these devices, take off any comb and the cutting unit of the device. Clean the comb and cutting unit under a warm tap. Shake off excess water and allow the parts to air dry completely. Never dry the cutting unit with a towel or tissue as this may cause damage.
Do not use soapy water or any cleaning detergents, as this can remove the protective grease on the cutter and effect its performance.
For more detailed instructions of your model, please refer to the user manual.
Showerproof groomers
Non-washable groomers
These groomers have a crossed-out tap symbol (Image 1) located in the user manual or printed on the back of the handle. These appliances cannot be washed with water. Before cleaning, ensure the power is off and the appliance is disconnected from the wall socket. Remove the grooming comb and the cutting unit off the appliance. Clean the cutting unit and the inside of the appliance with the cleaning brush provided or a cotton bud.
For more detailed instructions of your model, refer to the user manual.
Non-washable groomers
Oiling your groomer after cleaning
We recommend oiling your groomer regularly. You can apply a few drops of oil on the teeth of the cutting element of your groomer. You can use the oil provided in the packaging or any other sewing machine oil.
If the groomer you own has an oil reminder (Image 2), an image of an oil drop will light up as a reminder for you to oil your groomer after it has been properly cleaned.
Oil your groomers with the oil provided in the package or sewing machine oil.
For more detailed instructions of your model refer to the user manual.
Oil groomer
The information on this page applies to the following models: MG5930/65, MG9551/65, MG7920/65, BT1230/18, BT1235/18, BT1234/18, BT1233/18, MG7707/15, BT3125/15, BT3231/15, BT3241/15, BT3235/15, BT3102/25, BT1230/15, BT3101/25, BT1235/15, BT1234/16, BT1233/15, BT1232/15, BG3005/15, BT1232/18, MG5730/15, MG3721/77, MG3747/15, HC3505/15, BT3101/15, BT3102/15, BT3105/15, BT1210/16, BT7501/15, BG3006/15, BT3203/85, BT3201/15, BT3227/15, BT3221/15, BT3215/15, BT3205/15, BT3203/15, MG7745/15, BT3216/13, MG3730/15, MG7715/15, BT3211/15, BT1212/15, BT1210/15, BT1215/15, BT1213/15, MG7715/13, MG3710/13, MG3730/13, MG3732/65, QT3315/10, QT4009/15, QT4003/15, MG5740/15, QT3310/15, BT7206/15, QT4018/15, BT1000/15, BT1005/10, QT4006/15, BG1024/16, BG1025/15, BG105/11, BT3200/15, QG3382/15, QG3389/15, QG3347/15, QG3387/15, QT4001/15, QT4011/15, QT4000/15, HC3420/15, HC5450/15, BT9280/15, QG3383/15, QG3383/16, QG3333/15, QG3343/16, QG3320/15, QT4005/15, QT4019/15. Click here to show less product numbers
Get exclusive deals on sign up
Products
Support
My Philips
My Philips / Product Registration
support search icon
Type about your issue or model number to get support
FACE Stylers and grooming kits
Multigroomers
All-in-One Trimmer Series 7000
Troubleshooting & support
All-in-One Trimmer
Series 7000
Model number
MG5930/65