This e-Shop is operated by Analemma Commerce
Priority Customer Care – 18001022929
4.8 4 reviews / Write a review
Seller: Analemma Commerce Pvt. Ltd.
Additional Information:
Each reusable microwave steam sterilizing bag can be used to sterilize bottles, breast pumps and other baby products in just 90 seconds*
Each microwave steam sterilizer bag is proven to kill 99.9% of germs and bacteria.
Each bag includes a check box. By ticking the check box you can quickly and easily keep track of the number of times each bag has been used.
Each bag has a Safe handling zone. This is a marked area on the bag where it can be picked up safely straight from the microwave.
Each pack of microwave steam sterilizing bags includes five individual bags, and each bag can be used up to 20 times. This means that you will be able to sterilize baby bottles, breast pumps and other accessories up to 100 times in just one retail pack.
4 reviews
0%recommend this product
Development Stages
Design Specifications
Weight And Dimensions
What Is Included
This Winter Season Style Your Way With Philips Hair Styling Tools 2 min read With the start of winter season weddings, Christmas, and New Year's parties calling off everywhere throughout the nation, receiving an invitation to a big event is always a possibility. In such situations, considering your personalized look becomes imperative. With Philips' range of style-at-home products, we can assure you that you won't have to spend extra on styling and makeup this season—we've got you covered! For those who adore straight hair Try Philips Hair Straightener with Kerashine Ceramic Plates and SilkProtect Technology—your ticket to flawless smooth and silky strands at home. The advanced Keratin-infused ceramic plates glide smoothly through your hair, giving quick and easy styling, while SilkProtect Technology adds a silky, lustrous finish to every strand, giving you salon-like hair at home. For the ultimate glam, pair it with a Philips hair dryer and elevate your hair styling game all the time. This unique straightener stands out due to its even heat penetration, coupled with natural moisture retention. These features make it ideal, especially for occasions demanding fast and pitch-perfect straightening. If you're in search of a defined kit for hairstyling For those who struggle to decide on their hairstyle until the eleventh hour, Philips presents a perfect tool that encompasses every trendy hairstyle for the wedding season. The Multi Styler offers the flexibility to straighten, curl, or crimp with a single tool. This 3-in-1 Hair Styler is a versatile expert that caters to any last-minute hairstyle you desire, whether it's voluminous curls,sassy crimps, or straight strands. The design of this styler is convenient, easy to handle, and portable. You don't need to carry all three stylers when heading to any party or wedding occasion—just one friendly on-the-go styler in your vanity is sufficient. Choose any hairstyle that complements your attire. For those last-minute styling Hair styling can be a daunting task for many of us, especially when it comes to hair straightening. Say goodbye to hours of styling with the Hair Straightening Brush which is designed to achieve practical styling in the last few minutes. This brush ensures naturally straight hair in just 5 minutes, with Ionic Care for smooth, shiny hair. You just need to glide this brush from root to tip to attain bouncy and naturally straight hair all day. It is one of the best hair styling tools for your everyday glamorous look. The Philips Miss Fresher's Styling Kit It is the perfect hair styling kit for instant results and everyday use. The kit includes a hair dryer for quick drying and a hair straightener with ceramic-coated plates for sleek, straight hair. Its compact size and easy storage make it travel-friendly, ensuring this kit won't be set aside. Philips Hair Styling Tools: We've got you covered! With weddings and parties happening across the place, you never know when you might receive a big invitation from your nearest ones. Such situations prompt you to think about your personalized look and attire. With Philips' hair styling tools, get salon-like hairstyling at home and dazzle this winter with style. .p-heading-02 { letter-spacing: -.5px; font-size: 21px; line-height: 40px; color: #050505; font-weight: 700; margin-bottom: 24px; } .p-heading-03 { letter-spacing: -.2px; font-size: 21px; line-height: 26px; color: #050505; font-weight: 700; margin-bottom: 13px; } .p-heading-01 { letter-spacing: -1px; font-size: 32px; line-height: 50px; color: #050505; font-weight: 700; margin-bottom: 21px; } Discover beauty Whether you're looking for haircare or hair removal, Philips has the right beauty tools and tips for you. View all
Read MoreFacebook Twitter Email Pinterest Reading Time: 2 Min Table of Contents A Guide To Grooming The Groom and His Best Buddies Sangeet Celebs Charm The Wedding Day Elegance Reception Glamour Embrace Your Fashion Sense with Philips Men's Grooming Tools A Guide To Grooming The Groom and His Best Buddies The wedding season is in full swing, and we're gearing up for the grand celebration. While the excitement is palpable, choosing the perfect attire, beard, and hairstyle for the various functions can be pretty challenging. Unlike women, who have many style options, men often feel limited in their choices. However, it's a misconception. Men have just as many choices; they're less explored. This blog aims to guide the groom and their cool buddies in unleashing their inner dapper with Philips grooming tools. Sangeet Celebs Charm Choose a short, patchy beard look for the glamorous Sangeet night. Grow the beard for a week and get the perfect style with Philips beard trimmer. Its lift and trim system with power adapt technology help you to achieve precise trimming. Dress to impress with printed ethnic attire under an intelligent black band gala, creating a striking color contrast. This stylish ensemble ensures comfort for dancing through the night. The Wedding Day Elegance Experiment with an advanced hairstyling tool for men, the Philips Men’s Airstyler, and get salon-like hair styling on this big day. Infused with an Argan Oil Brush and a Narrow Concentrator, it helps you to dry and style your hair simultaneously. Consider a long pompadour beard style paired with a subtle, short stubble for a sophisticated and timeless look. Wear classic black and white or a luxurious hue like royal blue or maroon if you prefer a tux. And yes, for all groom buddies, try out Philips OneBlade. This is one of a kind that helps you to trim, shave, and style with no nicks and cuts, giving you a smooth grooming solution at home for such big occasions. Reception Glamour Also, after the nuptials, maintain the same beard style with a classic hairstyle and pair a mono-color shirt with an ethnic, classic-patterned Nehru jacket or Pathani suit. Complete the ensemble with cool trouser with a sleek chain & watch for a polished look. Opt for a short stubble look for the after-party to stand out differently. And yes don’t forget to use the Philips Beard Trimmer for finishing the smooth beard touch. Embrace Your Fashion Sense with Philips Men's Grooming Tools Embrace your fashion sense with this wedding season. Whether getting ready for a wedding night or maintaining a pathani look on reception day, try these cool Philips Beard Trimmers and hair styling tool to achieve the best look at home without breaking the bank at salons. Facebook Twitter Email Pinterest Face first Explore our full range of tools to shave, groom and style See all > You might like Read all articles > How to Grow a Scruffy Beard Read the article > Give your beard a border: The perfect beard neckline Read the article > html {scroll-behavior: smooth;}
Read MorePerfect Wedding Gifting Ideas for Your Loved Ones 2 min read Wedding Season: The grand day is drawing near, and what could be more fitting than a wedding gift commemorating the love between two individuals and enhancing their grooming and beauty game? This wedding season, Philips has curated some of the most exclusive wedding gifts to ensure you make a memorable choice for the couple on their big day. From beauty to grooming tools, we're delving into a trove of gifts that will adorn any couple. Tips to Consider Before Buying Wedding Gifts Selecting the perfect wedding gift is akin to finding the right grooming tool—it should complement the couple's style and make them feel fabulous. So, what makes a good wedding gift, especially in grooming? Firstly, personalization is paramount. Consider the couple's preferences: Is the bride a haircare enthusiast? A perfect hair styling tool set can enhance her everyday look at home. For a groom who relishes a close shave, a grooming kit will make him feel like a star every day. Secondly, longevity matters. The best wedding gifts should endure, just like enduring love. Look for classic brands and products that stand the test of time. Lastly, a unique wedding gift should always have an element of surprise and love. For instance, a beautifully wrapped grooming and beauty set can be a delightful gift for the newlywed couple—a gesture they'll fondly remember you for. Let’s Check Out The Perfect Wedding Gifting Ideas Who doesn’t love styling and personal care appliances? These high-styling grooming products are never ordinary and are always uniquely valued, ensuring they won't be passed on to someone else. You might think more than one grooming tool is needed for a significant wedding ceremony. Well, worry not, as Philips Wedding Gifts has compiled the ultimate styling tools explicitly designed for gifting, sparing you the stress of creating your own. Consider some unexpected twists on the usual picks for a truly memorable impact. Let's dive in! Grooming Buddies for the Perfect Groom If you're the groom's sister or best friend, men's grooming tools can be the best wedding gift idea for the groom. The Philips Complete Care Grooming Set is an excellent choice when hunting for ideal men's grooming tools. It is the secret sauce to help your man look his best and feel confident daily, earning you a prominent spot on the list of thank-you cards. Also, the Philips Multigroom all-in-one hair trimmer comes with 11 attachments to provide a full-body grooming solution. It helps to trim conveniently and style head-to-toe hair, allowing full grooming of your body. This can be a perfect grooming buddies for honeymoon travel and beyond. A Lil' Pampering for the Bride Bride beauty goodies make fantastic wedding presents, acting as the fairy godmother of beauty to ensure the newlyweds' skin is as smooth as their love for each other. Skin-friendly Philips epilator gifts promise more than just products or formulas; they embody the promise of a self-care routine, offering the confidence to look fabulous even after all the wedding festivities. In the same way, gifting a hair dryer and Philips hair straightener can elevate their hair care routine and help them flaunt salon-like hair at home. Also for last minute hair styling solution all you need is 5 min* with the Hair Straightening Brush, BHH730/00. Couple-Friendly Gifts: The Super Sassy Twin Combo Think of gifts the couple can use together. Gift a set featuring the Philips MasterStyle All-in-One Grooming Duo: the MG7715/65/ BHH816/00. This dynamic combo combines precision trimming and effortless styling for a comprehensive grooming experience. The ultimate hair styling tool offers effortless styling for a crimp, straighten, or curl quickly with minimize heat damage. Introducing the second Philips Facial Grooming Set: Philips All-in-One Groom & Style Kit | MG5930/65 BHA301/10 | BHH730/00 - Unleash Your Radiance! Gift this combo to upgrade their beauty routine with the Philips Grooming Set, featuring the all-in-one Multigroomer that offers 13 tools for the perfect grooming needs and the AirStyler - India’s No#1 Men’s Hair Styling Tool. And for the last minute hair styling solution for the newly wed bride all she needs is 5 min* with the Hair Straightening Brush, BHH730/00. This comprehensive set is designed as the perfect wedding gift for newlywed couples. So now it's time to buy your favourite wedding gifts With this extensive list, you're well-equipped for the wedding season. From salon-like styling tools to high-tech grooming kits, these gifts are like mini love notes for the happy couple. Pamper and celebrate the newlyweds with the Philips wedding gifts on this list, and become a memorable part of their special day. Wedding gifts aren't just presents; they are cherished memories wrapped in elegance. So, what are you waiting for? Visit the Philips online store today! .p-heading-02 { letter-spacing: -.5px; font-size: 21px; line-height: 40px; color: #050505; font-weight: 700; margin-bottom: 24px; } .p-heading-03 { letter-spacing: -.2px; font-size: 21px; line-height: 26px; color: #050505; font-weight: 700; margin-bottom: 13px; } .p-heading-01 { letter-spacing: -1px; font-size: 32px; line-height: 50px; color: #050505; font-weight: 700; margin-bottom: 21px; } Discover beauty Whether you're looking for haircare or hair removal, Philips has the right beauty tools and tips for you. View all
Read MorePainless Facial Hair Removal: The Ultimate Guide to Philips BRR454 2 min read Hey beauties, all you aspire to is a flawless face. Aren't you? But what about a facial hair problem? Oh, it's a common concern that transcends gender. Whether it's bothersome stubborn chin hairs or a noticeable "lady mustache," finding an effective solution for facial hair removal is a top priority, especially during the festive and wedding seasons. So, if you are pondering the most effective approach to hair removal, read a comprehensive guide to understand the best and most painless facial hair removal techniques to remove unwanted hair from your beautiful face. Before heading to any techniques, follow the do’s and don'ts: Do's: Gently Cleanse with Wet Cloth: Use a wet cloth to clean your face gently, keeping your hair soft. Hydrate Before Hair Removal: Always hydrate your face before shaving to reduce friction and prevent skin irritation. Don'ts: Caution for Sensitive Skin: If you have sensitive skin or a severe skin condition, avoid shaving or expired products to prevent adverse reactions. Most Commonly Facial Hair Removal Techniques: Waxing Waxing is a widely recognized and painful facial hair removal technique. It delivers a smooth finish for a few weeks, but it's painful and either done at home or can be expensive if done at a salon. Threading Threading is widely known, an old method of removing unwanted facial and eyebrow hair by a thread. This is used extensively for shaping and removing eyebrow hair. However, this popular procedure may lead to the pain, discomfort and skin redness. Laser Treatment Laser treatment is effective for dark hair and involves damaging the hair follicles to slow down regrowth. It's not suitable for light hair and requires multiple sessions. Shaving Undoubtedly, you're familiar with body shaving. It's a cost-effective, quick hair removal solution that can quickly be done at home.However, consistently shaving your body parts may result in thicker and more frequent hair growth, particularly when using a bad quality hair removal tool. Epilator From waxing laser treatments to waxing, various methods promise to rid us of unwanted body hair. Among these options, epilators are gaining recognition for being relatively cost-effective and convenient smooth facial hair removal techniques at home. So if you are ready to experience painless facial hair removal at home, then get your hands only on the Philips Facial Hair Remover, BRR454. Get Beautifully Smooth Skin with Philips Facial Hair Remover Philips Facial Hair Remover is uniquely designed trimmer to eliminate the finest hairs on the upper lip, chin, cheeks, and jawline effortlessly and without any pain. Let’s see how. Equipped with a built-in mirror, this compact and portable trimmer for women ensures ease of use, allowing you to achieve smooth skin wherever you are with no fuss and no fuzz. Its full-circle LED light enhances visibility, making it simple to spot and remove even the most delicate hair. This skin-friendly features a hypoallergenic washable head made up of corrosion-free material and offers a skin-friendly touch-up. The Philips Facial Hair Remover cuts hair close to the skin, with 86% of users reporting no pain compared to waxing or tweezing. The AA battery and its lightweight, compact design make this Philips trimmer an ideal tool for a quick touch-up on the go. Look and feel your best every day with the Philips Facial Hair Remover, the perfect partner for smooth skin. Discover beauty Whether you're looking for haircare or hair removal, Philips has the right beauty tools and tips for you. View all .p-heading-02 { letter-spacing: -.5px; font-size: 21px; line-height: 40px; color: #050505; font-weight: 700; margin-bottom: 24px; } .p-heading-03 { letter-spacing: -.2px; font-size: 21px; line-height: 26px; color: #050505; font-weight: 700; margin-bottom: 13px; } .p-heading-01 { letter-spacing: -1px; font-size: 21px; line-height: 50px; color: #050505; font-weight: 700; margin-bottom: 21px; }
Read MoreFacebook Twitter Email Pinterest Reading Time: 2 Min Table of Contents Philips OneBlade: Trim, Shave, and Style Fearlessly at Home Philips OneBlade: Trim, Shave, and Style Fearlessly at Home Before styling your facial hair, make sure you've got the basics down:. Know your face shape Choose a trendy look Beard trends are constantly evolving. Here are a few popular ones you might want to try: Pre-beard styling tips Let's follow these techniques to style your facial hair Shaving Trimming Styling Elevate your Grooming Game with Philips OneBlade Philips OneBlade: Trim, Shave, and Style Fearlessly at Home Facial hair has always been a symbol of masculinity and personal style. Maintaining a sharp, stylish look can be a real challenge in the whirlwind world of men's grooming. But what if we told you there's a game-changer that can redefine facial styling and grooming needs at home? The Philips OneBlade consolidates all your needs into one sleek device. This versatile grooming tool trims, shaves, and styles without causing any nicks and cuts. This blog will delve into trends, tips, and techniques to help you style your facial hair at home with precision and confidence. Before styling your facial hair, make sure you've got the basics down: Know your face shape Before using a beard trimmer, it's essential to understand your face shape. The most common face shapes are round, oval, square, and triangular. The right facial style can enhance your features. Tailor your beard according to your face to complement your unique structure. Round Face: Opt for a beard style that adds length to your face, such as a more extended goatee or a well-defined jawline beard. Oval Face: Lucky you! Oval faces can pull off almost any beard style, from short stubble to a full beard. Square Face: Oh! For this one, use the best trimmer for men to balance your honest face and angles with a short, well-groomed beard or a thicker beard with defined lines. Choose a trendy look Grooming eyebrows isn't just for the ladies. A catchy eyebrow can enhance your face's overall appearance while maintaining a masculine look. Beard trends are constantly evolving. Here are a few popular ones you might want to try: The Full Beard: This timeless classic exudes masculinity. Keep it well-groomed and thick for that rugged look. The Stubble: Keep your beard short stubble length for a low-maintenance style. It's effortlessly cool and works well for professionals. The Fade: Inspired by the fade haircut, this beard style features a gradual change in length from the top of your beard down to your neck. It's a modern and stylish men's grooming choice. The Van Dyke: This is a combination of a goatee and a moustache. It's a versatile style that can be adapted to various lengths and shapes. Pre-beard styling tips Your beard, like your hair, needs proper care. Keep it clean and conditioned to avoid a scruffy, unkempt appearance. Before using a beard trimmer, use a shampoo and conditioner to keep it soft, healthy, and smelling great. First, dry your beard. Comb your beard to detangle hair and ensure even trimming. Use a mirror in a well-lit area to get a clear view. Let's follow these techniques to style your facial hair Shaving Achieve a consistent beard length effortlessly by utilizing a beard trimmer or clippers equipped with an adjustable guard. Start with the trimmer blades set to a longer distance, progressively decreasing until you reach your desired size. For optimal results, consider using the Philips OneBlade, an epitome of shaving innovation that promises a fearless shaving experience with no nicks and cuts, making it the go-to choice for seasoned men and beginners. Trimming Use scissors to shape and define those areas if you prefer a specific trim, such as a goatee or moustache. For trimming facial hair, use OneBlade. The high-tech tool features a fast-moving cutter (6000x per minute) that is very efficient, even on longer and thicker hair. The OneBlade is a high-tech grooming tool engineered with a precision trimming comb, allowing you to trim your hair to different lengths. Styling Styling your edges is essential to getting styled. For styling it, use the Philips OneBlade. Designed with a dual-sided blade, it flows freely to the contours of your face, allowing you to style your edges and create clean lines. Its dual protection system—a glide coating combined with rounded tips—makes shaving more accessible, giving you an ultimate style. Among many Philips beard trimmers, Philips OneBlade is the best facial styling tool to fearlessly trim, style and shave with no nicks and cuts. Whether you're in the mood for a close-edge kind or planning to shave it off completely, choose this beard trimmer for men to meet all your needs. Elevate your Grooming Game with Philips OneBlade Facial grooming is about more than just looking good. It's about exuding unparalleled confidence and style every time you step out. So, whether you're gearing up for a sharp, clean-shaven look, a precisely defined beard, or a trendy style that sets you apart, the Philips OneBlade is your ultimate companion. It's your key to an effortless grooming solution, offering endless facial styling possibilities for the modern man. Facebook Twitter Email Pinterest Face first Explore our full range of tools to shave, groom and style See all > You might like Read all articles > How to Grow a Scruffy Beard Read the article > Give your beard a border: The perfect beard neckline Read the article > html {scroll-behavior: smooth;}
Read MoreGet Naturally Straight Hair in Just # 5 Minutes: BHH730/00 2 min read Picture a time when you see a chunk of hair attached to your brush after detangling and straightening the unmanageable, messy knots! Embracing the allure of naturally straight hair is a common desire among every woman. However, achieving this goes beyond just washing with a mild shampoo and blow-drying. To attain that coveted shiny and bouncy hair to flaunt, a hair straightening brush is an essential tool that turns your locks into a silky tresses. But where to find the perfect one? Don't worry; we have an excellent solution for you. Introducing the Philips Hair Straightening Brush with Silk Protect Technology. This innovative hair brush is designed to effortlessly tame frizzy hair, providing you with bouncy, silky and naturally straight hair in just 5 minutes*. This nifty hairstyling tool allows you to slay your hair smoothly and swiftly at home, leaving it stylish all day. A step-by-step guide to straightening your hair with the Philips Hair Straightening Brush: Navigating the realm of hair styling routine may appear daunting, yet it becomes an art with the proper steps and a perfect tool. Wash your hair Before diving into straightening, wash your hair using a mild shampoo or smoothing products. This crucial step prepares your hair by adding moisture, making it ready to handle the heat. Gentle Drying Avoid the common mistake of rough towel-drying, as it can enhance natural curls and make the straightening process more time-consuming. Instead, gently pat your hair dry and use a Philips hair dryer for efficient and smooth drying. Choose a Quality Hair Styling Tool Depending on how quickly your hair grows, you can enjoy two to three weeks of smooth skin between epilating. As epilation takes the root with the hair, the regrowth is also usually finer and softer. Keratin is a protein known for its nourishing and strengthening properties. If you have unmanageable hair, then using the Philips' hair straightening brush is a perfect way to add nourishment to your hair everyday. Designed using keratin-infused ceramic coating bristles, it glides through your hair smoothly. So whether you have frizzy or curly hair, mark a stroke with this beautiful hairstyling tool and have the shiny and naturally straight salon-like hair of your dreams at home. Brush and Detangle Hair Many of you face messy hair problems even after washing. After drying your hair don’t worry about detangles try out Philips Hair Straightener Brush, it is perfect for those with frizzy, knotted, or messy hair, its large paddle-shaped design allows you to straighten more hair in one go. Also, its triple-bristle design detangles and straightens hair gently while protecting your scalp from heat. With minimal force, brush your hair from roots to tips and achieve frizz-free hair in just 5 minutes*. Temperature Control Different hair strands may require varying heat settings, but keep the temperature low, especially if you're a beginner or styling your hair at home. Designed with ThermoProtect Technology, this brush maintains a constant temperature (with one push-control temperature set at 200°C) to distribute heat evenly, minimizing heat damage. Finally, end with hair styling Hair styling can be a daunting task for many of us, especially when it comes to hair straightening. Say goodbye to hours of styling with the Hair Straightening Brush, which is designed to achieve practical styling. You just need to glide this brush from root to the tip to attain bouncy and naturally straight salon-like hair all day. It is one of the best hair styling tool for your everyday glamorous look. So whether you are heading to office or any other occasion get flawless straight hair in 5 minutes* with the BHH730/00, Philips hair straightening brush and flaunt it everyday! Discover beauty Whether you're looking for haircare or hair removal, Philips has the right beauty tools and tips for you. View all .p-heading-02 { letter-spacing: -.5px; font-size: 21px; line-height: 40px; color: #050505; font-weight: 700; margin-bottom: 24px; } .p-heading-03 { letter-spacing: -.2px; font-size: 21px; line-height: 26px; color: #050505; font-weight: 700; margin-bottom: 13px; } .p-heading-01 { letter-spacing: -1px; font-size: 21px; line-height: 50px; color: #050505; font-weight: 700; margin-bottom: 21px; }
Read MoreFacebook Twitter Email Pinterest Reading Time: 2 Min Table of Contents A Comprehensive Guide for Men's Head-to-Toe Body Grooming Become a head-to-toe grooming virtuoso at home with this comprehensive guide: Let's start with eyebrows. Here's a straightforward routine for natural brow maintenance: Let's manage nose and ear hair Trimming nose hair: Trimming ear hair: Easily style your facial hair Groom your chest and back easily Finally, let's conclude with sensitive areas Take grooming to the next level with the Philips MG7715 A Comprehensive Guide for Men's Head-to-Toe Body Grooming In the ever-evolving landscape of contemporary masculinity, personal grooming has emerged as a symbol of sophistication and style. Whether you're a fan of the lived-in look or are more of a Dapper Dan, head-to-toe grooming has become a quintessential facet of self-care and refinement. But if you are still lagging in this art, then don't worry, lads.We're here to guide you through the perfect head-to-toe body grooming techniques, covering everything from your back to those tricky nose hairs. Let's start the men's grooming solution journey that transcends the mundane and elevates the pursuit of a personal style statement. Become a head-to-toe grooming virtuoso at home with this comprehensive guide The secret sauce to impeccable grooming lies in being consistent. Let's delve into the nuanced realm of male head-to-toe grooming, exploring the comprehensive guide to follow. Let's start with eyebrows Grooming eyebrows isn't just for the ladies. A catchy eyebrow can enhance your face's overall appearance while maintaining a masculine look. Here's a straightforward routine for natural brow maintenance • Brush your eyebrow hair upwards. • Trim any length of hair carefully with the new "MG7715" Philips trimmer. This multi grooming trimmer, with its reinforced cutting guards and a skin protector system, can trim your brows with no nicks and cuts. • Remember to wash your face after styling your brows. Let's manage nose and ear hair As we age, the growth of nose and ear hair becomes inevitable. Before you start, make sure you have an All-in-one trimmer to trim your nose and ear hair with precision. Trimming nose hair • Blow your nose to clear any mucus, and ensure you have adequate lighting and a mirror nearby. • A precise and versatile multi-grooming trimmer is your friend in managing these unwelcome guests with no nicks and cuts. • Gently insert the nose and ear trimmer into the nostril opening. Start the trimmer and use a circular motion to trim the first 5mm of hair inside your nostril. • This motion helps to trim the hair without causing any pain or discomfort. Trimming ear hair • Use a precision trimmer for ear hair. Make sure it's clean and functioning properly. • Gently insert the All-in-one trimmer into the outer ear area where you've already removed any long hair. • Start the trimmer and use a circular motion to trim the ear hair in the same way you did for your nose. Easily style your facial hair A beard requires attentive care for a neat appearance. Having a beard trimmer • Use a beard comb or brush to manage stubborn hair. • Consider using specialized beard shampoos to keep your facial hair clean. • For styling, trimming, and shaving your facial hair, choose the new Philips trimmer. Its DualCut technology and non-corrosive blades will create clean and sharpening lines, giving you the desired beard for a longer time. Groom your chest and back easily Grooming your chest and back can be challenging for some of you. Let's see how to start. Consider adding the All-in-one trimmer to provide a comprehensive chest and back grooming solution. • To groom your chest and back easily, use a trimmer with a comb guide attachment to control the length of the hair you're trimming or shaving. • To prevent nicks and cuts, gently pull the skin taut in the area you're trimming. • Choose the new Philips trimmer to shave safely below the neck to a closeness of 0.5mm. This showerproof styling tool will groom your chest and back hair while showering without any cuts. Finally, let's conclude with sensitive areas Be cautious when grooming sensitive areas. • Approach this sensitive area with caution. • Use an All-in-one trimmer with a unique skin protector system that guards even your most sensitive body areas effortlessly. • Always use a moisturizer after grooming sensitive areas. If you need help with how to groom certain areas, consider seeking professional advice. Take grooming to the next level with the Philips MG7715 Philips always remains at the forefront by consistently inventing and introducing its high-tech, engineered grooming tools that can elevate the grooming experience. Elevate your grooming level with the new Philips MG7715, 13-in-1, premium trimmer. This ultimate styling tool comes with 13 attachments to provide a head-to-toe men's grooming solution. Maintain your finest look with this versatile grooming tool available at your favorite Philips online store. We are here to shape your world! Facebook Twitter Email Pinterest Face first Explore our full range of tools to shave, groom and style See all > You might like Read all articles > How to Grow a Scruffy Beard Read the article > Give your beard a border: The perfect beard neckline Read the article > html {scroll-behavior: smooth;}
Read MoreTop 10 Breastfeeding Positions For Mothers While breastfeeding is generally quite a simple process, a few important things must always be kept in mind. There are numerous different breastfeeding positions that can be used. All of them have different advantages, and since all babies are different, it is important to find what works best for mom and baby. Why breastfeeding positions are important? Especially for a new-born, the nursing positions that a mum may choose will greatly impact the baby. These positions are important because while babies largely function on instinct, not all babies are the same and they may feel more comfortable latching, suckling or unlatching from a particular position. In addition, certain positions may make your baby more prone to problems such as spitting up or indigestion, or may even make them unable to feed at all. It is important to try a number of breastfeeding positions for new-borns for this very reason, so you can find the perfect one for both you and your baby. Finding the perfect baby feeding position will make every feeding a snap, and will help you establish an effective daily routine around feedings. It will also avoid complications for both you and your baby, such as discomfort, low weight gain, indigestion, cracking or soreness, and many more. Laid back/Reclined This is the most natural one most moms try first. Lie flat on your back, or reclined, and place baby on your chest. Cradle Hold This is the most common breastfeeding position. Sit upright, with baby positioned on their side, head and neck along your forearm and body against your stomach. Using a breastfeeding pillow across your lap may help avoid straining your back or shoulders. Cross-cradle hold Similar to the cradle hold, except using the hand opposite the side your baby is being fed from. This allows for support for baby’s neck and shoulders, and lets them tilt their head to latch. This position is good for smaller babies and those with latching problems. Rugby Ball Hold Sit with your baby resting along your forearm with their body tucked along your side, feet point in the direction of your back. This position supports your baby well and gives you plenty of control. Being tucked in so close to your body helps your baby get a sense of safety and comfort that may make it easier for them to feed. Side-lying position This position is ideal for night feeding and breastfeeding in bed or on the sofa. It can be more comfortable than sitting if you have stitches or any injuries. Lie down on your side and place your baby on their side, facing you. Perpendicular recline If you’ve had a caesarean delivery and can’t find a suitable position, reclining back with your baby’s body across your shoulder may help you nurse without putting any pressure on your abdominal area. Koala Hold If your baby needs to be upright due to reflux or an ear infection, this is the perfect position to avoid discomfort. Your baby straddles your thigh or hip, with their spine and head upright facing you. Dangle Feeding This position may seem awkward at first, but using it once in a while can help avoid discomfort from blocked milk ducts or conditions like mastitis. To dangle feed, simply lie your baby on their back and crouch over them on all fours. Nursing a sling For older children, for when you’re out and about, or when struggling with muscle strain, breastfeeding your baby in a sling can ease the pressure on you. This generally works best for babies experienced with nursing that can hold their own heads up. Ensure that you can always see your baby’s face clearly and their chin is not pressed against their chest. Dancer Hand For babies that struggle to stay latched, or who have low muscle tone, this position allows a great degree of support and control, along with a perfect view of the latch. To do this, you must support your breast with three fingers of one hand, while supporting their chin and cheeks with your thumb and index finger. Latching your baby onto your breast the right way A proper latch is a crucial part of ensuring smooth feeding sessions. Without a proper latch, your baby may end up underfed or with excess gas, while you may end up with soreness and severe discomfort over time. Different breastfeeding positions may make it easier for your baby to latch properly, so do try new things. Here a few different tips you can use to help your baby get a good latch. Use a comfortable chair Use a breastfeeding support pillow (or any other) Try tummy-to-tummy nursing positions Bring your baby to you, do not lean towards them Keep your baby’s ear, shoulder and hip aligned straight Aim your nipple towards baby’s upper lip/nose, not the middle of the mouth Make sure baby’s chin is not down to their chest Do not force the nipple and wiggle the mouth open – move back and try again Try and get as much of the areola in to your baby’s mouth as possible Unlatching your baby If you are suffering from severe soreness after every feed, you may need to give your baby guidance when it comes to unlatching. Generally, most babies will unlatch on their own once they have consumed their fill of breastmilk. However, it is not uncommon for some babies to stay latched on to mom’s breast without suckling, or to continue suckling after mom’s milk has been exhausted. While there may not be any immediate discomfort, it is likely that excessive suckling may lead to sore or cracked nipples in the long term. In this case it is important to help your baby unlatch. It is very important to break the suction of the latch before pulling your baby away, as this may lead to even more discomfort. Gently place your finger in between your breast and their gums to break the suction, before guiding baby’s head away from your breast gently. Breastfeeding positions to avoid While different breastfeeding positions have different benefits and disadvantages there are a few key things to always keep in mind when deciding between breastfeeding positions for new-borns. If your baby is not positioned properly, the stimulation of your breasts may not be sufficient to express enough milk, which can lead to severe problems long term. In addition, improper positioning can lead to physical discomfort for both mom and baby, along with excess gas build-up and sore nipples. Keep the following tips in mind, no matter what nursing position you choose. Do not hunch over baby Unless you are dangle feeding, you should not hunch over your baby. Keep your back straight and bring baby up to your breast to ensure a better latch and less spinal discomfort. Make sure their spine is aligned Make sure that baby’s body and head are not facing in different directions. Not only does this make it difficult for them to swallow, but is usually uncomfortable for them, and may make it harder for you to find a comfortable position as well. Ensure they are not too far from the breast If baby’s body is too far from yours, they may still manage to latch on, but they will pull on your nipple while feeding. This may not only cause discomfort, but may also lead to them not getting enough milk during feeding time. Breastfeeding should not be an uncomfortable process, especially once you are more accustomed to it and settle into a routine with your baby. Most common issues with breastfeeding are a matter of experimenting with different positions and techniques to find what works best for your and your baby’s individual needs. Ultimately, the goal is to find the perfect balance for you and your baby, and soon breastfeeding will be a snap.
Read MoreBaby Nipple Confusion Between Breast & Bottle If you are wondering what is nipple confusion, or what is the best feeding bottle to avoid nipple confusion, look no further. In babies that are fed with a combination of breast and bottle regularly, nipple confusion is a common issue when it comes time to switch between the two. What is nipple confusion? If you’ve been searching for nipple confusion baby advice, first it is important to understand what nipple confusion is and why it occurs. Contrary to popular belief, nipple confusion does not necessarily mean that your baby does not understand the difference between their mother’s breast and the bottle – but cannot get a hold of how the different technique applies to feeding time. Essentially, nipple confusion is what happens when a baby struggles to alternate between bottle feeding and breast feeding, especially if the bottle is introduced at a particularly young age. If your baby struggled to get the hang of breastfeeding at first, it is likely they will struggle with the bottle as well. That is why the timing of introducing the bottle can go a long way in avoiding nipple confusion, as well as selecting the perfect bottle that mimics the human breast as closely as possible – such as Philips Avent bottles. Does your baby know the difference between breast and bottle? Most babies understand the difference between a breast and bottle quite easily, as the texture, taste, feeling and suckling technique are very different for both methods. In fact, if you suspect you have a nipple confused baby, it may simply be that they prefer one method over the other. Feeding from a bottle requires much less effort than breastfeeding, since they can suck with their lips and gravity allows them to get all the milk they want right away. While breastfeeding, babies must learn the tricky technique of taking a nipple far back into their mouth and using their tongue to pump the milk, which can take more than a minute to begin. However, many babies prefer breast feeding due to the comfort, safety and closeness to mom. It is very possible and likely then that your baby does not actually have nipple confusion, but simply prefers one nipple over the other. Nipple confusion and feeding problems Whether your baby simply has a preference for one feeding method over the other, or actually cannot tell the difference between the two, nipple confusion can lead to feeding problems for a variety of reasons. If your baby prefers breast feeding, they may refuse to feed from a bottle entirely. If breast feeding throughout the course of the day is not an option for any reason, this poses a serious challenge as babies, especially in earlier months, require very frequent feedings daily to meet their nutritional needs. This may lead to them being underfed and may be a severe inconvenience to mothers who cannot be around their babies 24x7 due to work or other reasons. Babies that do not get enough milk on a regular basis will show delayed growth in reaching physical and mental development milestones, therefore this is a potentially serious issue. On the other hand, if your baby prefers bottle feeding, they may not want to be breastfed, or may not be able to adjust to it. For mothers who cannot express their breastmilk manually or with the use of a pump, this may cause engorgement and severe discomfort. Babies may also end up latching and unlatching improperly. This can not only cause discomfort in the form of sore or cracked nipples, but can cause baby to swallow excessive amounts of air that leads to gas buildup and discomfort for baby. They may end up spitting up more than usual, or simply not consuming enough milk as well. How to avoid nipple confusion Avoiding nipple confusion for your baby is not a particularly complex process. By timing when you introduce the bottles, selecting the best feeding bottle to avoid nipple confusion, and following a routine, you can avoid nipple confusion. The best way to avoid nipple confusion is to wait until your baby is experienced at breast feeding with no problems, before introducing any type of feeding bottles. While this may differ for every baby, most experts agree that three weeks is the minimum time babies should be exclusively breast fed before being introduced to the bottle, and longer if they have any issues with nursing. Another way to avoid nipple confusion is to select a bottle that mimics the feeling of a human breast as closely as possible, and is designed to be interchanged with breast feeding. Philips Avent natural bottles are one such bottle that help avoid nipple confusion by providing as close to natural an experience as possible. Following a set schedule of when to breast feed and when to bottle feed may also help your baby come to terms with switching between the two methods. For example, breast feeding for the first and last feeds of the day consistently and using the bottle during the day.
Read More
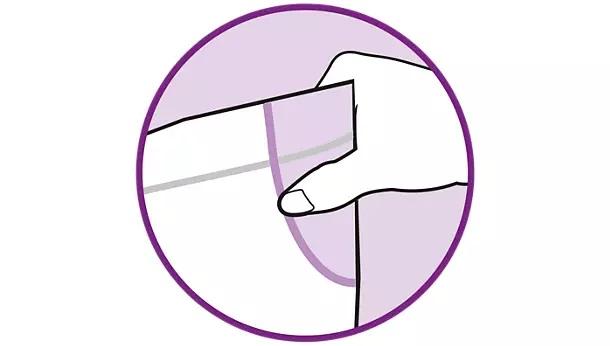
Solving Baby Latching Problem While Breastfeeding Why is your baby not latching? If you’re struggling with baby not latching properly, there are numerous reasons that may be causing this. Low muscle tone, nipple confusion, or a tongue tie may be preventing your baby from latching on effectively. Another common issue is baby not sucking after a proper latch, which may be causing them to underfeed. To solve the issue of improper latching, it is first very important to understand the cause of baby not latching, so that you can take appropriate action regarding it. One important thing to keep in mind is that while babies do instinctually know the breastfeeding process, and their natural suckling instincts kick in very quickly, they do still need time to adjust to the breastfeeding process. If your baby is less than a month old, be patient if they are struggling with latching and breastfeeding. It is perfectly natural for it to take a few weeks for them to become totally comfortable with the ins and outs of breastfeeding. If your issue is baby refusing breast after bottle feeding, then your baby may be suffering from nipple confusion. Nipple confusion, contrary to the name, is not necessarily when your baby cannot tell the different between a natural and an artificial nipple, but when it cannot get accustomed to the difference between the two. This is especially common when bottle feeding is introduced too early before baby has a chance to get fully accustomed to breast feeding in the first place, or when using an artificial nipple that does not mimic the human breast to a well enough degree. From a baby’s perspective, feeding from a bottle is considerably easier than feeding from a breast, which is why they often prefer it to nursing directly. If they are not fully comfortable with breastfeeding before they begin bottle feeding, it will be tough for them to make the switch back and forth. There may also be an underlying medical condition that could be preventing your child from latching on effectively. If your child was born with a low birth weight, especially in the case of premature birth, there is a chance that your baby has what is known as ‘low muscle tone’ that can lead to baby not latching, or baby not sucking. Low muscle tone refers to a birth condition where the baby’s muscles are not fully developed yet, so they struggle with common physical actions. This can include holding head upright comfortably, suckling, swallowing, or even being comfortable in a breastfeeding position. While low muscle tone is a problem that can be solved in the long term, in the short term it does make nursing much more difficult. Fortunately, there are certain nursing positions that may make it easier for a baby with low muscle tone to latch on properly. Along with low muscle tone, any birth defects that affect your baby’s palette, mouth, tongue or lips will greatly impact their ability to latch properly, and in turn to breastfeed properly. Some of these conditions are very well known, such as cleft lip or cleft palate, and can be seen readily with the naked eye. In most cases, they require minor surgery and do not leave any long-term impacts. A tongue tie is another, lesser known oral condition that can impact a baby’s ability to breastfeed effectively. Essentially, a tongue tie occurs when the frenulum (the webbing underneath the tongue that attaches it to the bottom of the mouth and jaw) is too short, or too thick, and does not allow for an effective range of motion. Since breastfeeding requires babies to use their tongues to stimulate the let down and expression process to begin, a tongue tie can greatly hamper their ability to do so. While some tongue ties are very clearly visible, only a medical professional can make the diagnosis of a tongue-tied baby. Surgical and non-surgical procedures are available to cope with the challenges of baby not latching properly due to tongue tie, so it is important to consult a medical professional at the earliest if you suspect it. If you’re struggling with lactation, specialized lactation consultations can help you with every part of the process. It is important to remember that many moms face issues with breastfeeding, and it is nothing to be ashamed of. If you’re struggling with baby not latching, do not be alarmed – there are a wealth of options and resources for you to rely on to understand your way around the process better and get on the way to healthy nursing. Top 5 nursing techniques that can help A proper latch is a crucial part of ensuring smooth feeding sessions. Without a proper latch, your baby may end up underfed or with excess gas, while you may end up with soreness and severe discomfort over time. There are numerous different breastfeeding positions that you can try to suit you and your baby’s individual needs. In addition to changing up the position, here a few different tips you can use to help your baby get a good latch if they are struggling to do so regularly. Use a breastfeeding support pillow (or any other) Using a specialty breastfeeding pillow will allow both mom and baby to relieve the pressure on their muscles while breastfeeding. This makes it easier for both you and your baby to focus on getting a good latch, instead of holding their body in position. The ease and comfort of it may help your baby get used to the process of breastfeeding sooner. If your baby has low muscle tone this may be especially useful for them. If you cannot get a specialized breastfeeding pillow, you can use a normal pillow instead – just make sure that the size is comfortable for you to hold in your lap and rest your baby on, that it is not uncomfortable for your little one, and that the material will be easy to clean. Keep your baby’s ear, shoulder and hip aligned straight Make sure your baby’s spine is oriented straight in whichever breastfeeding position you choose to go with. Having them upright on your knee or lying down on top of you may make this easier if they have low muscle tone. This makes a significant difference in latching and breastfeeding, since babies struggle to swallow effectively when their body is not aligned in a straight line. Aim your nipple towards baby’s upper lip/nose, not the middle of the mouth While the nipple has to go as far back into baby’s mouth as possible, the position of the tongue and lips around the nipple is crucial for an effective latch. Baby’s will latch on properly and be able to use their tongues to stimulate the nipple only if the angle and position of insert is high enough to let them use their tongue effectively. Lightly press the nipple against the upper lip and nose until they open up and latch on. Do not force the nipple and wiggle the mouth open – move back and try again It may seem like simply getting the nipple into baby’s mouth would be the first step to getting a good latch, but it is important for your baby to latch on themselves. Simply forcing the nipple into their mouth is not enough for them to start suckling properly as they have to position in a way where the nipple is placed far back in the mouth and they can use their tongue to stimulate the let-down reflex. It may be frustrating at first, but if your baby simply refuses to open their mouth and latch on, simple move back, wait a little while and try again. If mixing breast and bottle, set a routine and follow it One major reason for baby refusing breast after bottle feeding is that they may simply be struggling to cope with switching between the two different methods – also known as nipple confusion. One way that this problem can be fixed is by setting a routine of bottle and breastfeeding and following it. For example, breastfeeding for the first and last feeds of the day, and bottle feeding through the rest of the day. This gives baby a chance to get accustomed to both, and to get used to knowing what to expect at different times of the day. Be patient – it may take a while for both you and baby to get used to the routine, but it will make feeding time much easier in the long run. In addition to these techniques, remember that all breastfeeding positions have their own pros and cons. Every baby is different and so is every mom, so check out different positions that you can try until you find one that works for you. If you’re still struggling with breastfeeding after trying the home remedies and different positions, it may be a good idea to reach out to a lactation consultant who can help you get to the root of your problem and help you move beyond it. If you suspect a medical condition as the underlying cause, consult a medical professional at the earliest.
Read More© Philips Personal Care B.V. 2024
Cookies are small text files that are downloaded onto your device when accessing this website and may entail sharing of data with 3rd parties. read more...